Monday, February 24, 2014

Linux VST Plug-in for Ardour

I now have a functioning template for a working VST effect in Ardour. I'm still using 2.x format, since my version of Ardour (v3.0) doesn't recognize VST v3.0 (at least not on a Linux platform). The video below is just a screen capture of the plug in in action. The effect algorithm is just a signal-finding method I used at the cosmic ray experiment I worked at during grad school called the Generalized Second Difference (Mariscotti 1995).

Despite the controls going from zero to one, the parameter 'z' really ranges from 0 to 30 and 'm' goes from 1 to 17. The filter kernel will have 3 + 2*m*z elements, so this works well to test the limits of the DSP (it actually performed way better than I expected). 'm' determines the "width" of the filter while 'z' affects the "smoothness".

Some notes:

I compiled everything but the examples in VST3 SDK into a static library. I copy vstplugmain.cpp into whatever project I'm working at and add -I${VST_HOME} to my include flags for compiling. I add the static library directly so the compiler can pull whatever it needs from it when creating the plugin .so file. With that "template", all I really need to use for reference when writing the code for the plugin are the files in public.sdk/sources/vst2.x.

Still can't get my own GUI working. When I try to use Qt, Ardour seg-faults before the recent projects window pops up. When I try skeleton code Ardour crashes when I try to open the controls for the plugin. I presume the latter case occurs because I'm not handling signals from the Host program. But I don't understand what's going on in the first case. I can't run a proper "debugging" environment because I didn't build debugging versions of any of the dependent packages for Ardour. Not saying I can't, just looking at a few day's work to get that going and I feel like the solution probably isn't all that complicated.

Friday, February 7, 2014

Ardour and Linux VST

I have Ardour 3 compiled and working. I don't have a realtime kernel, so I can't run Jack in realtime mode and there is some significant latency (~1/4-1/2 second, didn't time exactly). I looked up the interwebs to see what was involved in getting a realtime kernel set up and found this gem:

http://askubuntu.com/questions/72964/how-can-i-install-a-realtime-kernel 

I followed the instructions exactly on a VM running the same OS as my notebook and it worked without a hitch. I decided it may be better to use the same kernel version (3.2.0). The closest match with a corresponding RT patch was 3.2.52. It took about two hours to compile everything but so far it's working perfectly. Just one hitch, not sure it's totally related to the kernel update: Firefox and emacs look-and-feel reverted to some ugly state and Firefox stopped recognizing the printer. I did some ridiculous things like reinstalling gtk3 and cups. Eventually, I just rebooted and everything was back to normal (but I have and RT kernel now).

I tried running Ardour with Jack in RT mode, but it wouldn't open my project. Unsure if I needed to rebuild everything (looking back, I don't think I had to) I felt it better to do that anyway, since originally I was adding packages kind of willy-nilly as I was building the dependencies. The new build of Ardour still didn't work. After scanning the interwebs for people with similar problems, I found a solution that worked for me: Simply add my username to the audio group with sudo usermod -a -G audio ${username}. The latency is much more manageable now (~30-40ms).  Not good for real production stuff, but good enough as a sandbox for plugin development.

I tried compiling the examples that come with the VST3 SDK. The following define flags will get most to compile:

-DPTHREADS -DBYTEORDER=kLittleEndian -DFORMAT_INT64A="\"%ld\"" -DFORMAT_UINT64A="\"%lu\"" -DENDLINE_A="\"\\n\""
You will also need to define things like -DRELEASE/-DDEBUG/-DDEVELOPMENT and -DPLATFORM_64.

Even with all these, I still had to hack my way through to get some of the code to compile. I won't reproduce the code here but if you've been programming C/C++ for a while you should find the required mods to be pretty straightforward.

I skipped trying to compile the examples, especially because a bunch are in a subdirectory with a space in the name (pain in the butt!). I copied one of the examples into QtCreator, tinkered with the configuration a bit and got it to build a nice SO.

When Linux VST's are enabled in Ardour, it searches the standard shared object library path for a folder named lxvst (I think status quo is to put it in /usr/local/lib/lxvst). I opened the plugin manager by right clicking on the mixer pane. There wasn't anything obviously wrong with the SO itself, so I searched through the Ardour source code to find out where the load was failing. Turns out Ardour 3 isn't equipped to read Linux VSTs compiled according to VST version 3. It wasn't clear to me how to mod Ardour to get this to work. I also haven't been able to figure out how to get the example code to build in 2.x format.

Instead, I created a new dummy plugin called JustVisiting. It took a little bit of tinkering, but eventually I got Ardour to recognize it. Here's the skeleton code:

justvisiting.h:

#include <stdio>
#include "public.sdk/source/vst2.x/audioeffectx.h"

class JustVisiting : public AudioEffectX {
public:
    JustVisiting(audioMasterCallback iAudioMaster, 
        VstInt32 iNumPrograms, VstInt32 iNumParams);
    void processReplacing(float **inputs, float **outputs, VstInt32 sampleFrames);
    bool getVendorString(char *text);
    VstInt32 getVendorVersion();
    VstInt32 canDo(char *text);
    VstPlugCategory getPlugCategory();
};

justvisiting.cpp:

#include "justvisiting.h"

AudioEffect *createEffectInstance(audioMasterCallback audioMaster) {
    JustVisiting *effect = new JustVisiting(audioMaster,1,1);
    return effect;
}

JustVisiting::JustVisiting(audioMasterCallback iAudioMaster, 
    VstInt32 iNumPrograms, VstInt32 iNumParams)
    : AudioEffectX(iAudioMaster,iNumPrograms,iNumParams){
    // nothing to allocate
    this->setNumInputs(2);
    this->setNumOutputs(2);
    this->setBlockSize(1);
}

void JustVisiting::processReplacing(float **inputs, float **outputs, VstInt32 sampleFrames) {
    // TODO: do something
}

bool JustVisiting::getVendorString(char *text) {
    sprintf(text,"CamelNote");
}

VstInt32 JustVisiting::getVendorVersion() {
    return 0;
}

VstInt32 JustVisiting::canDo(char *text) {
    if ( strcasecmp(text,"sendVstEvents") )
        return -1;
    else if ( strcasecmp(text,"sendVstMidiEvent") )
        return -1;
    else if ( strcasecmp(text,"receiveVstEvents") )
        return -1;
    else if ( strcasecmp(text,"receiveVstMidiEvent") )
        return -1;
    else if ( strcasecmp(text,"receiveVstTimeInfo") )
        return 0;
    else if ( strcasecmp(text,"offline") )
        return -1;
    else if ( strcasecmp(text,"midiProgramNames") )
        return -1;
    else if ( strcasecmp(text,"bypass") )
        return -1;
    return 0;
}

VstPlugCategory JustVisiting::getPlugCategory() {
    return kPlugCategEffect;
}
Be sure to build this in with vstplugmain.cpp from the VST SDK so that the VSTPluginMain symbol gets compiled in. Ardour uses this as the entry point for the Linux VST (It actually looks for 'main' first, and if it can't find it, then looks for VSTPluginMain. When if finds that one, it will complain that the version is too new and may not be compatible with Ardour). At the bare minimum, you'll need to define processReplacing, but there are a number of other member functions you should override for safety. I haven't gone through them all yet.

Monday, February 3, 2014

Building Ardour from Source

I want to develop a VST plugin.  Problem is I'm working on a Linux platform.  Audacity is apparently popular, but it only supports VST plugins on its Windows and Mac editions.  I recently discovered Ardour, which is really nice.  And, because I don't seem to like doing anything the easy way, decided to build it from the source.  It has eleventy-billion dependencies which are listed on their download page.  I grabbed the sources from all of them and built them as well.

I'm not including all of the details, but I will say that in most cases, I was able to cd into the package directory, run configure-make-make install without problem.  Some of these use 'waf', which until the other day I was completely unaware of.  In these cases, you run waf configure-waf-waf install instead, so it's very similar (and you get colorful output text).

I'm not sure if there was a "proper" order for building the packages.  I just kind of winged it and I got Ardour working.  I started by installing jack with apt-get jackd2 jackd2-dev.  I also kept everything segregated by installing the dependencies in /opt/ardour-deps.  Of course, this requires making sure LD_LIBRARY_PATH=/opt/ardour-deps/lib before running ardour, but no biggie.  I just aliased the executable with 'env LD_LIBRARY_PATH=/opt/ardour-deps/lib /usr/local/bin/ardour3'.

Here's a brief transcript of my notes while putting everything together:
  • libsndfile - got source, no probs building
  • gnomecanvas - got source, required intltool and libgail to build
  • libsigc++ - source from ardour site, no probs building
  • libcairo - source from ardour site, no probs building
  • libgtk+ - source from ardour site, no probs building
  • lrdf - source from ardour site, no probs building
  • boost 1.49.0 - got source, no probs building
  • fftw 3.3.1 - provided link broken, only found 3.3.3, apparently incompatible with other dependencies.   ultimately had to get with apt-get fftw3 fftw3-dev
  • glibmm 2.32.0 - got source, no probs building
  • cairomm 1.10.0 - got source, no probs building
  • pangomm 2.28.4 - got source, no probs building
  • atkmm 2.22.6 - got source, no probs building
  • gtkmm 2.24.2 - got source, no probs building
  • libart_lgpl 2.3.21 - got source, no probs building
  • libgnomecanvasmm 2.26.0 - got source, no probs building
  • liblo 0.26 - got source, no probs building
  • raptor2 2.0.6 - got source, no probs building
  • rasqal 0.9.28 - got source, no probs building
  • redland 1.0.15 - got source, no probs building
  • libogg 1.3.0 - got source, no probs building
  • flac 1.2.1 - got source, couldn't make examples with fftw 3.3.3, had to use alternate
  • libvorbis 1.3.2 - got source, no probs building
  • libsamplerate 0.1.8 - requires libsndfile
  • aubio 0.3.2 - requires alternate fftw
  • rdflib 3.2.0 - link broken, had to find elsewhere.  requires python_setuptools to install.
  • lv2 1.2.0 - 'waf' install, no probs building
  • serd 0.18.2 - 'waf' install, no probs building
  • sord 0.12.0 - 'waf' install, no probs building
  • sratom 0.4.2 - 'waf' install, no probs building
  • lilv 0.16.0 - 'waf' install, gave some message about python bindings disabled, haven't come across any consequences yet.
  • suil 0.6.10 'waf' install, no probs building
  • curl 7.25.0 - found source, long time building.  seemed to hang at 'check recvfrom', but waited ~5 minutes and it worked.
  • taglib 1.9.1- found source, requires cmake
  • vamp 2.5 - had to do some hunting from link, eventually found newer version.  built & installed and this apparently works.
  • rubberband 1.8.1 - can't confirm that I grabbed right version.  required alternate fftw3 lib.
I skipped the freetype "patch", but I think the text renders just fine on my platform.

Here's more detail on building some of the packages:
  • Building boost
    • ./bootstrap.sh --prefix=/opt/ardour-deps
    • long wait w/o messages after ./b2 install
      • ~2-5 minutes with no output, then 10+ minutes to compile
    • accidentally followed steps for alternative build.  No matter bc files put in /tmp directory.
  • Want to do cairo next, received complaints about no libpng
  • libsig++ - easy compile with config/make/make install
  • back to cairo
    • apt-get install libpng12-dev
    • apt-get install libpixman1-dev
    • apt-get install libfontconfig1 libfontconfig1-dev libfreetype6 libfreetype6-dev
  • building glibmm
    • needs glib-2.0
    • apt-get install libglib2.0-0 libglib2.0-dev
  • building pangomm
    • note: accidentally had build cairo instead of cairomm
    • apt-get install libcairo2-dev
    • apt-get install libpango1.0-dev
  • libatkmm
    • required apt-get install libatk1.0-0 libatk1.0-dev
  • aubio had issues, wouldn't accept my install of fftw3.  had to run apt-get install libfftw3-dev and it worked.
  • building ardour (final step)
    • if you get "unexpected version of vamp header" errors, then in waf configure: also had to include ALL vamp subdirs to "--also-includes"
    • had to add @aubio - rtprio 99 line to /etc/security/ldconfig (NOTE: this didn't work)
    • had to configure jack to not run in rtmode.
 This literally took me all day last Saturday, but Ardour appears to run fine.  I haven't experienced any crashes yet (although I haven't really pushed my luck).  I set user memory lock limit of 2048000 kB and max files of 16384 (no matter what, program complains of limits, but I think these are fair, since I'm not planning on doing anything fancy).

Effect Testbed GUI

I had to learn some Qt programming for work, so I thought I'd take advantage of this and do some of my own at home over the weekend.  I wanted to write a GUI for a DAW plugin testbed.  I'm aware that there are some more appropriate graphics toolkits, such as JUCE, but Qt is supported on multiple platforms, and seems to offer more flexibility as far as control customization.

FYI: I'm running Ubuntu 12.04 LTS on a HP Pavilion dv4 notebook.  I installed qt4 and qtcreator using apt-get.  I had never used the qtcreator IDE before, but I'm pretty happy with it so far, as I tend to rely a lot on auto-complete and that feature seems to work pretty well.

First, I sketched out my design (fig. 1).  I wanted to model it after an old effects rack that I used about 15 years ago.  I can't remember much about it beyond it having an alphanumeric LED display.  I wanted to have a dial to cycle through effects and presets and possibly to edit effect settings.  I also wanted a number pad so that I could enter specific values.  Different effects will have different parameters, so I wanted some "selector" buttons so that parameters displayed at in the LED window could be selected.

Fig. 1: Sketch of GUI before I started coding.

In Qt, the buttons and dial are easy (just QDial and QPushButton objects).  As of Qt4, stylesheets are supported in the buttons, but not QDial.  The tricky part was going to be the LED display.

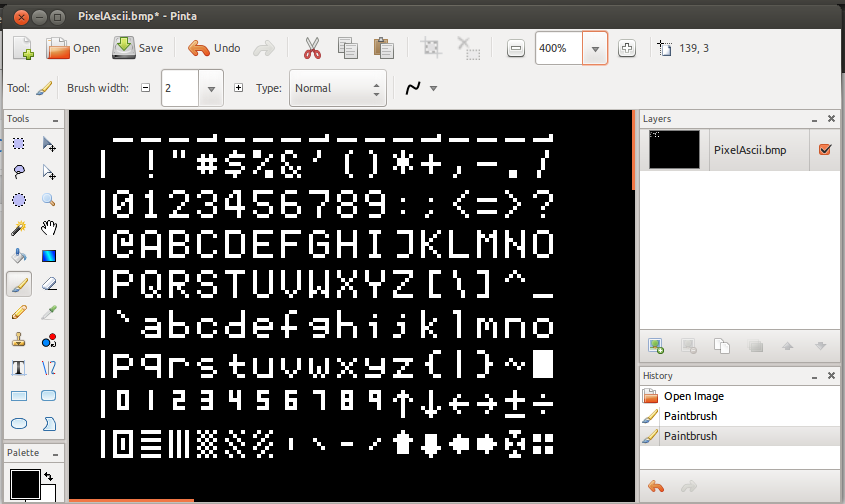
For each "cell" of the LED display, I could have mapped characters to bitmaps of display characters (I'm sure a google image search would have turned up some pretty quickly).  But I didn't see the fun in that.  I decided to define my own characters.  I used pinta image editor to draw the characters pixel by pixel (fig. 2) (this actually only took about an hour or so).  Each character fits on a 5x7  cell.  To make it easier to map strings to these characters, I followed ASCII standard for the alpha-numeric characters (0x30 [space] to 0x7e [tilde]).  And I filled the remaining characters with random stuff (superscript digits, arrows, random patterns) to get a total of 128 characters.

Fig. 2: Layout of pixels for each type of text cell character.

Next, I came up with an encoding scheme to save the pixel mapping for each character to a 35-bit number.  Since I needed to use long integers anyway, I decided to encode one column of pixels in each byte.  "lit" pixels are represented by binary 1's.  I encoded each character into a 128-element lookup table (this actually took a couple of hours), then wrote a function that takes a character number, pixel row and column as arguments and returns a boolean 'true' if that pixel should be "lit" or not.

In Qt, I defined an LEDText class to represent a single character cell in an LED display.  The constructor requires an x-y offset relative to the parent container (an LEDDisplay object).  The character is constructed by first drawing a rectangle with a background color of dark blue.  Then a 5x7 array of squares is drawn on top.  If the pixel is "off", then the square is drawn with a color just slightly brighter than the background, to simulate the effect you get with you actually look at one of these things.  If the pixel is "on", then its color is set to white and a larger square is drawn on top.  Its color is set to blue and made semi-transparent.  This gives the pixel itself a blue color and gives the appearance of "glowing".  The LEDDisplay class creates an array of LEDText cells and sets an additional border to keep them centered.

In Qt creator, laying out controls is fairly straighforward if you use the UI designer tool.  The drawback to using this tool is that it is highly dependent on the Qt version and takes away some of the freedom you have in controlling GUI behavior.  However, if you want to throw together something quickly then it is very useful.

Fig. 3: Screenshot of finished GUI.
With some more work, I was able to forward key press events to the GUI.  For example, pressing the '5' key automatically fired the same function as when you click the '5' button on the GUI.  I also declared six "dummy" effects.  The GUI main class decides the number that is assigned to each one, but when you press one of the "opt#" keys the GUI enters "selection" mode and forwards the control functions to virtual functions defined by the effect classes.

Even without taking advantage of the "signals/slots" feature of Qt, the GUI works well as far as updating components as key and mouse events are fired.  However, as I develop this further I may try to lean on that a little more.

Friday, November 8, 2013

XiCam Tech Issues

I decided to give up on my so called "XiCam" project.  The end goal was to control a digital camera via USB from a laptop or Android tablet.  When I first attached my camera to my notebook, it appeared that the drivers would only treat the camera as a mass-storage device.  When attached to a Windows computer, however, a window pops up asking for permission to install Samsung's Intelli-Studio program, which apparently includes the capability to update new firmware to the attached camera.  This told me two things: 1) There is more information which can be received from the camera than appears from Linux systems and 2) the capability exists to update firmware from a host PC.

However, even if I managed to get the firmware from the camera, there is still no guarantee that I'll be able to understand it once I've disassembled the code.  And even after spending the effort in figuring it out, then I may still not be able to hack it to control exposure time or trigger the camera via USB.  I decided I was better off, for my own sanity, to just buy a different camera when I'm ready to take pictures at that level.

It turns out, without any special settings or using my home made mounting bracket, I can still get decent pictures.  Here's a picture I took of Jupiter this morning:

Tuesday, November 5, 2013

USB Protocol

When you plug a USB device into a port on your computer (aka the "host"), the hardware signals the USB host controller that a new device has been attached.  The host controller then sends a command to the newly attached device via the default endpoint in an attempt to find out what the device is (vendor ID, product ID, product type, etc.).  Then it decides what drivers need to be used to work with that device.

I had originally thought, based on the simple configuration, that the only features available to control via USB was access to the data on the flash drive.  I now believe that this is simply how the driver treats the device.  If I were running Windows, I would be prompted to install the Intelli-Studio software, which is apparently built into the device.  If I ever wanted to update the firmware, I would have to do that through Intelli-Studio.  This means two things.  First, the capability to grab software from the camera exists.  Second, the capability to replace the camera firmware via USB also exists.

Just as before, I monitored the USB debugging data from port 2 by issuing the command:

$ sudo cat /sys/kernel/debug/usb/usbmon/2u > bus2data.txt
in one terminal window and,
$ tail -f bus2data.txt
in another. I plugged the camera into the USB port, but no messages were produced until I actually turned the camera on.

The first group of messages appear to be communication between the host controller and the USB port hub,

ffff880137cc2840 2476103001 S Ci:2:000:0 s 80 06 0100 0000 0040 64 <
ffff880137cc2840 2476103172 C Ci:2:000:0 0 18 = 12010002 00000040 e8040613 00000102 0301
The term "Ci:2:000:0" translates to "Input control packet to USB bus 2, device zero, endpoint zero". Eventually I start getting USB events like this,
ffff880137cc2840 2476234892 S Ci:2:007:0 s 80 06 0100 0000 0012 18 <
ffff880137cc2840 2476235047 C Ci:2:007:0 0 18 = 12010002 00000040 e8040613 00000102 0301
This submission/callback pair is the device telling the host controller what it is. The first byte is length (0x12=18 bytes), the next is bDescriptorType (0x01=1), USB minor and major version (0x00, 0x02 or "2.0"), The next word contains the device class (0x00), subclass (0x00), protocol (0x00) and maxPacketSize (0x40=64 bytes). The next word contains the vendor and product ID numbers (0x04e8 = Samsung, 0x1306 = ST100 digital camera). Then comes device version (minor, major, in this case 0.0), manufacturer (the '1' here means SAMSUNG, though I'm not sure yet how the USB host controller knows this) and the '2' designates that it is a digital camera. The 3 indicates the serial number. These must be pointers to information strings or something like that. Finally, the '0x01" at the end tells the number of device configurations that are available.

The next submission/callback pair describes the first (and only) configuration.

ffff880137cc2840 2476235204 S Ci:2:007:0 s 80 06 0200 0000 0009 9 <
ffff880137cc2840 2476235293 C Ci:2:007:0 0 9 = 09022000 010100c0 00
which corresponds to this:
 Configuration Descriptor:
    bLength                 9
    bDescriptorType         2
    wTotalLength           32
    bNumInterfaces          1
    bConfigurationValue     1
    iConfiguration          0 
    bmAttributes         0xc0
      Self Powered
    MaxPower                0mA

The next pair is the first (and only) interface,

ffff880137cc2840 2476235412 S Ci:2:007:0 s 80 06 0200 0000 0020 32 <
ffff880137cc2840 2476235547 C Ci:2:007:0 0 32 = 09022000 010100c0 00090400 00020805 50000705 02020002 00070582 02000200
which corresponds to this:
  Configuration Descriptor:
    bLength                 9
    bDescriptorType         2
    wTotalLength           32
    bNumInterfaces          1
    bConfigurationValue     1
    iConfiguration          0 
    bmAttributes         0xc0
      Self Powered
    MaxPower                0mA
    Interface Descriptor:
      bLength                 9
      bDescriptorType         4
      bInterfaceNumber        0
      bAlternateSetting       0
      bNumEndpoints           2
      bInterfaceClass         8 Mass Storage
      bInterfaceSubClass      5 SFF-8070i
      bInterfaceProtocol     80 
      iInterface              0 
      Endpoint Descriptor:
        bLength                 7
        bDescriptorType         5
        bEndpointAddress     0x02  EP 2 OUT
        bmAttributes            2
          Transfer Type            Bulk
          Synch Type               None
          Usage Type               Data
        wMaxPacketSize     0x0200  1x 512 bytes
        bInterval               0
      Endpoint Descriptor:
        bLength                 7
        bDescriptorType         5
        bEndpointAddress     0x82  EP 2 IN
        bmAttributes            2
          Transfer Type            Bulk
          Synch Type               None
          Usage Type               Data
        wMaxPacketSize     0x0200  1x 512 bytes
        bInterval               0
So what happened to endpoint one? And what does this mean?
ffff880137cc2840 2476235709 S Ci:2:007:0 s 80 06 0300 0000 00ff 255 <
ffff880137cc2840 2476235792 C Ci:2:007:0 0 4 = 04030904
ffff880137cc2840 2476235826 S Ci:2:007:0 s 80 06 0302 0409 00ff 255 <
ffff880137cc2840 2476235917 C Ci:2:007:0 0 48 = 30035300 61006d00 73007500 6e006700 20004400 69006700 69007400 61006c00
ffff880137cc2840 2476235936 S Ci:2:007:0 s 80 06 0301 0409 00ff 255 <
ffff880137cc2840 2476236042 C Ci:2:007:0 0 20 = 14035300 41004d00 53005500 4e004700 20002000
ffff880137cc2840 2476236055 S Ci:2:007:0 s 80 06 0303 0409 00ff 255 <
ffff880137cc2840 2476236167 C Ci:2:007:0 0 28 = 1c034500 30003000 30003000 30003000 30003000 30003000 32002000
ffff880137cc2a80 2476236645 S Co:2:007:0 s 00 09 0001 0000 0000 0
ffff880137cc2a80 2476236792 C Co:2:007:0 0 0
ffff8801122bfc00 2477238949 S Ci:2:007:0 s a1 fe 0000 0000 0001 1 <
ffff8801122bfc00 2477260196 C Ci:2:007:0 0 1 = 01
0x30=decimal 48, 0x03=index 3, 0x53='S', 0x61='a', 0x6d='m', 0x73='s', 0x75='u', 0x6e='n', 0x67='g', 0x20=' ', 0x44='D', 0x69='i', 0x67='g', 0x69='i', 0x74='t', 0x61='a', 0x6c='l'
0x14=decimal 20, 0x03=index 3, 0x53='S', 0x41='A', 0x4d='M', 0x53='S', 0x55='U', 0x4e='N', 0x47='G', 0x20=' ', 0x20=' '
0x1c=decimal 28, 0x03=index 3, 0x45='E', 0x30='0', 0x32='2', 0x20=' '
So these must be the info strings, although the string "camera" doesn't show up. The first byte must be the string size in bytes (wide char format), the second byte the number of info strings, in this case '3', then the actual strings ("Samsung Digital", "SAMSUNG ", and "E00000000002 ").

Sunday, November 3, 2013

XiCam Assembly

There are two parts to this project. One was developing a device driver to run my digital camera from my tablet. This is likely a fools errand, but you can't succeed unless you try, right? The other, far simpler, part is to build a structure that holds the camera lens fixed against the telescope eyepiece. The assembly in the pictures cost me about $9 from The Home Depot. It consists of a 2"x5" joiner plate (Simpson TP15). It's thin, but fairly rigid. I drilled holes for a 1/4" machine screw (I suppose this is fairly standard for mounting cameras to a tripod) and a 3/8" screw. I held the plate steady by hand, and nearly slit my wrist when the drill passed through and the plate spun loose. So be wise: use a clamp if you try this. I used a 1" long machine screw with nut and locking washer to hold the camera in place. I used a 3" hex bolt with nuts and standard washers (the lock washers tend to tilt the bolt unless you really tighten it). The bolt feeds into a 1" pipe clamp, which happens to fit the eyepiece perfectly. It does not, however, fit around the larger eyepiece, which I think might be more useful due to the wider field of view.

I was tinkering around with the built-in exposure and ISO settings. The ST100 allows up to ST3200 and uses an exposure scale of -2 to 2 (I don't really know what that means. Could it be a multiplier for integration time?). The first picture I took the other night. It was fairly overcast, and we get a lot of light pollution around here. I used exposure setting "zero" (for "auto") and ISO 3200. The second picture is Vega, taken last night using my medieval eyepiece attachment device. The high magnification makes vibrations even more annoying, so I will certainly need to get a larger clamp so I can use the lower magnification, larger FOV eyepiece.